

Diving into the world of Italian desserts brings us to a delightful and nutty treasure: the Pignoli Cookie. These cookies are a testament to the simplicity and elegance of Italian baking, combining rich almond paste with the crunchy, buttery goodness of pine nuts. In this article, we’ll embark on a culinary journey, exploring everything from the origins of these beloved cookies to tips for perfecting your batch at home. Whether you’re a seasoned baker or new to the kitchen, this guide promises to equip you with all you need to create these gluten-free delights, making any occasion a bit more special.
Part 1: Introduction to Pignoli Cookies
Ah, Pignoli Cookies—the mere mention of these Italian delicacies conjures images of festive gatherings and sweet, nutty indulgence. Originating from the sun-drenched shores of Italy, these cookies have carved a niche in the hearts of dessert lovers worldwide. But what exactly makes them so irresistible?
At their core, Pignoli Cookies are a celebration of simplicity and flavor. Made with a base of almond paste, these cookies offer a chewy, marzipan-like center, encased in a golden crust of toasted pine nuts. The contrast in textures—crunchy on the outside, soft and chewy on the inside—is a dance of delight for the taste buds.
The history of these cookies is as rich as their flavor. Almond paste and pine nuts were once considered luxury ingredients, reserved for special occasions and celebrations. This tradition of indulgence continues today, with Pignoli Cookies often gracing holiday tables and festive events. Yet, despite their luxurious roots, these cookies are deceptively simple to make, requiring just a handful of ingredients.
What sets Pignoli Cookies apart is their gluten-free and dairy-free nature, making them a welcoming treat for those with dietary restrictions. The absence of flour and butter does nothing to diminish their flavor; if anything, it enhances the natural sweetness and nuttiness of the almonds and pine nuts.
As we delve deeper into the nuances of these cookies, from their ingredients to the art of baking them to perfection, you’ll discover that Pignoli Cookies are more than just a treat—they’re a celebration of Italian baking, a nod to the simplicity of ingredients, and a testament to the joy of sharing good food with loved ones. So, let’s roll up our sleeves and embark on this delicious journey together, shall we?
Part 2: Ingredients and Substitutions
When it comes to baking Pignoli Cookies, the magic lies in the simplicity of its ingredients. Each component plays a crucial role in creating the cookie’s signature texture and flavor. Let’s break down these key ingredients and explore some clever substitutions that can cater to various dietary needs or pantry limitations.
Understanding Almond Paste
At the heart of every Pignoli Cookie is almond paste, a sweet, nutty blend that gives these cookies their distinctive chewy texture and rich flavor. Made from ground almonds and sugar, almond paste is the backbone of this recipe, providing moisture and depth. It’s important not to confuse almond paste with marzipan; the latter is sweeter and used more for decoration than baking. For those looking to dive deeper into the nuances of almond paste and its pivotal role in Pignoli Cookies, this resource sheds light on the differences between almond paste and marzipan.
The Role of Pine Nuts
Pine nuts, or pignoli, lend their name to these cookies, offering a buttery crunch that contrasts beautifully with the soft center. These tiny nuts are not only delicious but also packed with nutrients, making each bite a wholesome indulgence. Pine nuts can be pricey, so for those looking to experiment, other nuts like chopped almonds or hazelnuts can serve as a substitute, though the flavor profile will shift slightly.
Substitutes and Variations
While the traditional recipe is beloved for its simplicity, there’s room for creativity. For those avoiding egg whites, aquafaba (the liquid from a can of chickpeas) can be a surprising yet effective vegan alternative. It similarly binds the dough, ensuring the cookies maintain their structure without spreading too much.
Sugar plays a key role in sweetening the cookies, but for a less refined option, coconut sugar or even a light maple syrup could offer interesting depth and a slight reduction in the glycemic index. Remember, liquid sweeteners will affect the dough’s consistency, so adjustments may be needed.
Lastly, for a gluten-free and dairy-free treat, Pignoli Cookies naturally fit the bill. However, always double-check your almond paste ingredients to ensure it’s free from gluten contaminants, especially if you’re baking for those with celiac disease or gluten sensitivities.
By understanding the roles of these key ingredients and knowing how to adapt the recipe with suitable substitutions, you’re well on your way to baking Pignoli Cookies that can delight a wide range of palates and dietary needs. Whether sticking to the classic recipe or venturing into variations, the essence of these Italian cookies—rich, nutty, and irresistibly chewy—remains a constant pleasure.
Part 3: Step-by-Step Recipe
Embarking on the journey to create the perfect batch of Pignoli Cookies is a delightful endeavor. With our key ingredients at the ready, let’s dive into the step-by-step process that will lead us to these golden, nutty gems. Follow these instructions, and you’ll be on your way to mastering this Italian classic.
Preparing the Dough
- Start with the Almond Paste: Break or slice 7 ounces of almond paste into small pieces. This helps it blend more smoothly with the other ingredients. Place the pieces into the bowl of a food processor.
- Add the Sweetness and Binders: To the food processor, add ½ cup of granulated sugar, 1 large egg white (or your chosen substitute), and a pinch of salt. The salt enhances the flavors and balances the sweetness.
- Blend to Perfection: Process the mixture until it forms a thick, smooth paste. This usually takes about a minute. Halfway through, pause to scrape down the sides of the bowl, ensuring no lumps of almond paste remain.
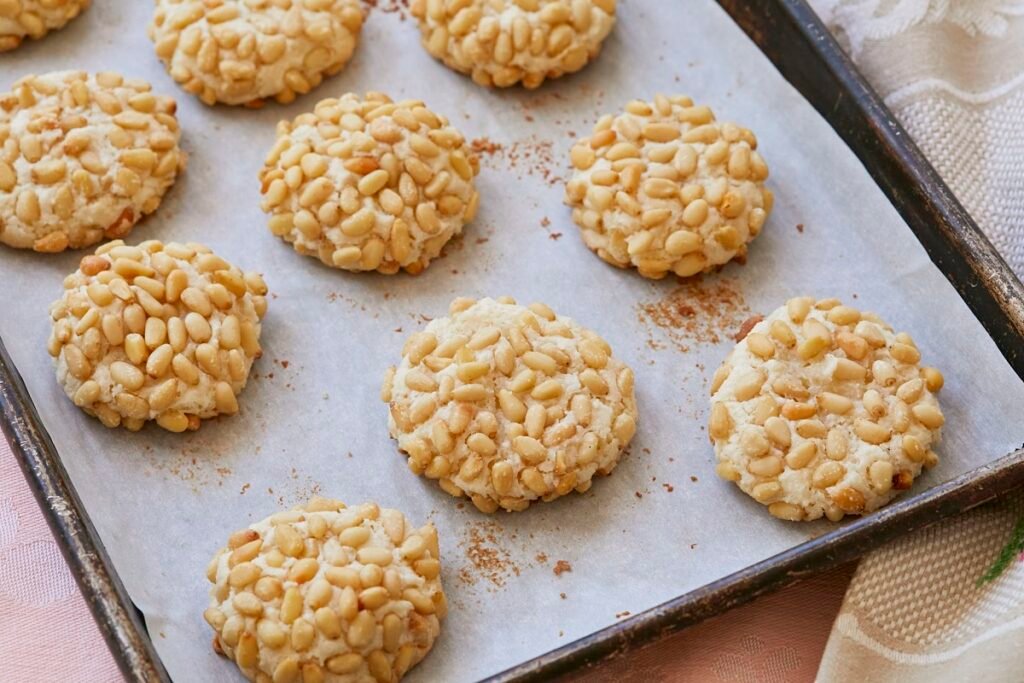
Shaping and Coating with Pine Nuts
- Forming the Cookies: With the dough ready, scoop out rounded tablespoons of the mixture. Roll each scoop between your palms to form a ball. If the dough feels too sticky, chilling it for 10-15 minutes can make this step easier.
- The Pine Nut Coating: Pour a cup of pine nuts into a shallow bowl. Roll each dough ball in the pine nuts, pressing gently to ensure they adhere. This step not only adds flavor and texture but also gives the cookies their signature look.
Baking and Cooling
- Preheat and Prepare: Preheat your oven to 350°F (175°C) and line a baking sheet with parchment paper. This prevents sticking and ensures even baking.
- Space the Cookies: Place the coated dough balls on the prepared baking sheet, leaving about 2 inches between each cookie. They will spread slightly as they bake.
- Bake to Golden Perfection: Bake the cookies for 18-20 minutes, or until the pine nuts are golden and the edges of the cookies have set but the centers remain soft.
- Cooling Down: Allow the cookies to cool on the baking sheet for a few minutes before transferring them to a wire rack. This step is crucial as the cookies will continue to set and develop their texture as they cool.
Creating Pignoli Cookies is as much about the process as it is about the ingredients. Each step, from blending the almond paste to the final cooling, contributes to the cookie’s final taste and texture. While they’re best enjoyed fresh, their flavor deepens after a day, making them a wonderful treat to share—or savor solo—any time.
By following these steps, you’ll not only fill your kitchen with the sweet, nutty aroma of baking cookies but also capture a piece of Italian culinary tradition. Whether for a holiday, a special occasion, or a simple joyous day, Pignoli Cookies promise to delight and impress.
Part 4: Tips, Tricks, and Troubleshooting
Mastering the art of Pignoli Cookies doesn’t stop at following the recipe. There are nuances and little tricks that can elevate your baking experience, ensuring every batch turns out just right. Let’s dive into some tips, tricks, and troubleshooting advice to help you navigate the common pitfalls and make your cookie-making process as smooth as possible.
Achieving the Perfect Texture
- The Right Consistency: If your dough is too sticky, don’t hesitate to chill it. A brief stint in the refrigerator can make it easier to handle, allowing you to roll the cookies without a mess.
- Uniformity is Key: For cookies that bake evenly, make sure your dough balls are uniform in size. A small ice cream scoop or a tablespoon can be your best friend here, ensuring each cookie not only looks the same but bakes uniformly.
Storage and Make-Ahead Tips
- Storing Your Cookies: Pignoli Cookies are best enjoyed fresh, but they can be stored in an airtight container at room temperature for up to a week. The key is ensuring they’re completely cooled before storage to maintain their texture.
- Freezing for Later: For longer storage, these cookies freeze beautifully. Place them in a single layer on a baking sheet to freeze, then transfer them to a freezer-safe bag or container. They can be enjoyed for up to a month, thawed at room temperature, or briefly warmed in the oven.
Troubleshooting Common Issues
- Cookies Spreading Too Much: If your cookies are spreading more than you’d like, ensure your oven is correctly calibrated. An oven thermometer can help with this. Also, chilling your dough before baking can prevent excessive spreading.
- Uneven Baking: Rotate your baking sheet halfway through the baking time. This simple step can help counteract any hot spots in your oven, ensuring all cookies bake evenly.
- Pine Nuts Falling Off: Press the pine nuts gently into the dough to help them adhere better. If they still seem reluctant to stick, a light brush of egg white on the dough balls before rolling them in pine nuts can act as a “glue.”
Baking Pignoli Cookies is a delightful process, filled with the anticipation of that first delicious bite. However, even the most experienced bakers can encounter hiccups along the way. By keeping these tips and tricks in mind, you’ll be well-equipped to handle any challenges that arise, ensuring your cookies are as delightful to make as they are to eat.
Remember, baking is as much about the journey as the destination. Each batch of cookies is an opportunity to refine your skills, experiment with flavors, and, of course, spread joy to those who taste them. So, embrace the process, learn from each experience, and let the sweet, nutty aroma of Pignoli Cookies fill your home.
Part 5: Customizing Your Pignoli Cookies
One of the joys of baking is making a recipe your own by adding a personal touch. Pignoli Cookies, with their simple base and elegant flavor, offer a perfect canvas for customization. Whether you’re looking to add a hint of spice, a burst of citrus, or experiment with different nuts, there are plenty of ways to make these cookies uniquely yours.
Flavor Variations
- Citrus Zest: Adding a teaspoon of lemon or orange zest to the dough can introduce a bright, refreshing contrast to the rich nuttiness of the cookies. The zest oils infuse the dough with a subtle aroma and flavor that complements the almond and pine nuts beautifully.
- Spices: For a warm, aromatic twist, consider incorporating spices such as cinnamon, nutmeg, or cardamom into the dough. A quarter teaspoon of any of these can add depth and warmth, making the cookies even more irresistible.
- Extracts: Vanilla or almond extract can enhance the cookie’s flavor profile. Just a half teaspoon of vanilla extract or a quarter teaspoon of almond extract can elevate the overall taste, adding layers of complexity to the cookies’ flavor.
Nut Substitutions
While pine nuts are traditional and lend their name to these cookies, their availability or cost might prompt you to explore alternatives. Here are a few substitutions that can work well:
- Almonds: Blanched and slivered almonds, lightly toasted and chopped, can offer a similar texture and a complementary flavor to the almond paste in the dough.
- Hazelnuts: For a different but equally delicious option, toasted and skinned hazelnuts, chopped into small pieces, can replace pine nuts. Hazelnuts add a rich, distinct flavor that pairs wonderfully with the almond base.
- Pistachios: If you’re feeling adventurous, pistachios can provide a pop of color and a unique taste. Their slightly sweet, nutty flavor and vibrant green hue make for a visually stunning and tasty alternative.
Customizing your Pignoli Cookies is not only about tweaking the flavors but also about making the recipe more accessible and suited to your taste or dietary preferences. Whether you stick closely to the traditional recipe or venture into new variations, the key is to have fun and enjoy the process of creating something that reflects your taste.
Remember, baking is an art and a science, but it’s also an expression of creativity. Don’t be afraid to experiment with these suggestions or come up with your adaptations. Each batch of cookies is a new opportunity to explore, learn, and, most importantly, indulge in the delicious results of your culinary adventures.
Part 6: Nutritional Information and Dietary Considerations
In a world where dietary needs are as diverse as the people themselves, Pignoli Cookies stand out as a delightful treat that caters to a wide audience. Not only are these cookies a testament to the rich flavors of Italian baking, but they also align with gluten-free and dairy-free dietary requirements, making them an inclusive option for gatherings or simply a mindful choice for those adhering to specific dietary guidelines.
Gluten-Free Goodness
The absence of flour in Pignoli Cookies makes them a naturally gluten-free treat. This characteristic is particularly appealing in today’s culinary landscape, where gluten sensitivities and celiac disease are increasingly prevalent. For those managing these conditions, finding delicious and safe dessert options can be challenging. Pignoli Cookies offer a solution—a sweet indulgence without the worry of gluten.
When preparing these cookies for someone with gluten sensitivities, it’s crucial to ensure that all ingredients, especially the almond paste, are certified gluten-free. Cross-contamination can occur during the manufacturing process, so always check labels to ensure the safety and well-being of your guests or family members.
Dairy-Free Delight
Similarly, Pignoli Cookies are dairy-free, relying on the natural fats in nuts to provide richness and moisture. This makes them an excellent option for those with lactose intolerance or dairy allergies, as well as for individuals following a vegan lifestyle when substituting the egg white with a plant-based alternative like aquafaba.
The dairy-free aspect of these cookies does not detract from their flavor or texture; if anything, it allows the almond paste and pine nuts’ natural tastes to sheminently prominently. This characteristic is a boon for those looking to reduce their dairy intake without sacrificing the joy of a well-made dessert.
Nutritional Considerations
While Pignoli Cookies are accommodating to various dietary needs, they are, like all treats, best enjoyed in moderation. The primary ingredients—almond paste and pine nuts—are rich in nutrients such as protein, fiber, and healthy fats. However, they are also calorie-dense, and the cookies contain sugar, contributing to their overall caloric content.
For those mindful of their nutritional intake, Pignoli Cookies can be a satisfying treat that aligns with a balanced diet. Their richness means that one or two cookies can be quite satisfying, making them a perfect end to a meal or a luxurious accompaniment to afternoon tea or coffee.
In summary, Pignoli Cookies not only bringItalian of Italian culinary tradition into our homes but also offersolutionful option for those navigating dietary restrictions. Their gluten-free and dairy-free nature, coupled with the nutritional benefits of nuts, makes them a thoughtful choice for anyone looking to indulge in a sweet treat that is as inclusive as it is delicious.
Part 7: Frequently Asked Questions
In the world of Pignoli Cookies, questions abound, from inquiries about substitutions to queries on storage. Let’s address some of the most common questions, shedding light on these delightful Italian treats and ensuring your baking experience is as smooth and enjoyable as possible.
Can I use marzipan instead of almond paste?
While both marzipan and almond paste are made from almonds and sugar, they serve different purposes in baking due to their varying textures and sugar content. Almond paste, with its lower sugar content and coarser texture, is ideal for creating the chewy, moist center of Pignoli Cookies. Marzipan, being sweeter and smoother, is better suited for decorations and confections. For the authentic texture and flavor of Pignoli Cookies, sticking to almond paste is recommended.
How long can I store Pignoli cookies?
Pignoli Cookies can be stored in an airtight container at room temperature for up to a week, ensuring they maintain their texture and flavor. For longer storage, you can freeze the cookies for up to a month. To enjoy, simply thaw them at room temperature or give them a brief warm-up in the oven to revive their delightful texture.
Are pignoli cookies gluten-free?
Yes, traditional Pignoli Cookies are naturally gluten-free, as their main ingredients are almond paste, sugar, egg whites, and pine nuts—none of which contain gluten. However, when purchasing almond paste or any other ingredients, it’s crucial to check labels for any potential cross-contamination with gluten-containing products, especially if you’re serving these cookies to someone with celiac disease or gluten sensitivity.
Can I make pignoli cookies without a food processor?
Absolutely! While a food processor makes quick work of blending the almond paste with the sugar and egg whites, you can use a stand mixer with a paddle attachment or even mix by hand, although it will require more effort. The key is to ensure the almond paste is broken down into fine pieces before mixing, allowing for a smooth, uniform dough.
What can I do if my dough is too sticky?
If the dough for your Pignoli Cookies is too sticky to handle, chilling it in the refrigerator for about 10-15 minutes can make a world of difference. The cold helps firm up the dough, making it easier to roll into balls. Dusting your hands with a bit of powdered sugar can also prevent sticking without affecting the dough’s consistency.
Tackling these FAQs head-on ensures that your Pignoli Cookie baking adventure is as enjoyable as it is successful. Remember, baking is a journey of discovery, and with each batch, you’ll find new ways to perfect your craft. Whether you’re a seasoned baker or a curious newcomer, the world of Pignoli Cookies welcomes you with open arms and delicious possibilities.
Part 8: Conclusion and Final Thoughts
As we wrap up our journey through the delightful world of Pignoli Cookies, it’s clear that these Italian treasures are more than just a treat; they’re a celebration of simplicity, tradition, and the joy of baking. From their humble ingredients to the rich history that has carried them through generations, Pignoli Cookies embody the essence of Italian baking—where less is often more, and the quality of ingredients speaks volumes.
This guide has walked you through every step of the process, from selecting the right ingredients to mastering the baking technique, and even exploring ways to customize the recipe to suit your taste or dietary needs. We’ve tackled common questions and offered tips to ensure your baking experience is as rewarding as the moment you take that first, heavenly bite.
Baking Pignoli Cookies is an act of love—a way to bring a piece of Italian culinary tradition into your home, to share with family and friends. It’s a reminder that some of the best moments in life are those spent around the table, enjoying simple pleasures together.
So, whether you’re baking these cookies for a special occasion, as a holiday treat, or just because, remember that each batch is a canvas for your creativity. Don’t be afraid to experiment, to make each recipe your own, and most importantly, to enjoy every step of the journey.
Thank you for joining me in exploring the art of making Pignoli Cookies. May your kitchen be filled with the sweet aroma of baking, your cookies be ever-crunchy and chewy, and your days be brighter with the joy of sharing these delightful treats. Happy baking!